Recently, I endeavored to put together a slightly nicer sound system since I was reorganizing my desk anyways- the existing setup consisted of a pair of large "white van scam" speakers liberated from their third or fourth owner for the lowly sum of $20 and a no-name 15W per channel amp borrowed from my dad's "parts bin" of assorted audio equipment. The system put out adequate sound, but to be perfectly honest it wasn't going to win over any audiophiles. The bass extension was reasonable enough but the midrange and tweeter sounded muddy, and tweaking the onboard knobs on the speakers was more apt to make one channel drop out intermittently than help anything.
So then, my mission was to get a better pair of smaller speakers and an amp to drive a much nicer sound system for my new computer. I was intrigued by the idea of building my own set of bookshelf speakers, and I didn't want to spend a whole lot of money otherwise. While I weighed my options on the speakers, the almost universally glowing reviews of the Lepai LP-2020A+ amp caught my eye. A 20W per channel amp that supposedly sounded amazing for the bargain price of $20? It seemed almost too good to be true.
After ordering one on Amazon I hooked it up to a pair of good home built bookshelf speakers- also on loan from the parts bin- to get a baseline idea of what I was working with. The sound was reasonable enough. With the tone defeat on it sounded rather flat and tinny, but with the tone circuit engaged it was easy to tweak into sounding pretty decent for the price tag. Not exactly "amazing" as some reviewers had raved, but certainly quite nice for only costing 20 bucks.
The unit is not without its flaws, however. The QC on the amp is more than just a bit dubious; the PCB itself was actually designed wrong, so the 3.5mm headphone jack input has its stereo channels reversed. The RCA jacks are fine, but such an elementary error doesn't exactly inspire confidence in the quality of manufacture. It's a simple fix- just reverse your speaker wires if you use the 3.5mm jack- but a fix you really should not have to do in the first place. Inside, there are little dots of soldering flux here and there but the solder joints all seem to be pretty well sorted. The only glaring shortcoming would be the low quality of the components. They're not utter garbage, but definitely made to the price point. Finally, it might seem like a nitpick, but the bright blue LED ring around the volume knob was just too damn bright, especially when it sits in my peripheral vision while on my desk.
The guts, as it came:

It seemed that a lot of the shortcomings of the Lepai were due to subpar internals, and so replacing the capacitors, inductors, and op-amps would yield a great improvement in sound quality. Since I have basic soldering skills, I figured it would make a nice side project. I put together a bill of materials for replacing all the important components and picked some suitable replacements online, mostly higher quality Nichicon and Panasonic capacitors. Once everything had arrived, I got down to business and desoldered both the through-hole caps and the surface mount op-amps on the tone/volume circuit:

You can see I marked the PCB with sharpie to prevent any confusion, but it turned out that it wasn't necessary- the negative side of the caps and pin 1 on the op-amps were already marked for installation at the factory.
Any high quality op-amp like an LM4562/OPA2107/LT1364 will do for the replacement. I went with Linear Technology's LT1364:

Installed onto the PCB along with the Nichicon caps:

The surface mount soldering was a bit of a challenge, considering how small the pins are on the op-amp. It's certainly not going to win any beauty contests, but it's functional.
If you look closely in the last picture, you will notice that the surface mount capacitors on C30 and C31 have been removed- these were originally ceramic capacitors which are pretty much universally regarded as unfit for audio applications due to their properties. These were the coupling caps for the input signal, so it would be a clear improvement to replace them with something better. The replacement film caps were much larger than the ceramic caps, but they secured to the surface mount pads quite solidly with a bit of solder. I also had to solder on a bit of extra wire onto C30's leads to get it to fit on the PCB comfortably:

Again, never going to win any beauty contests but it's functional. Next up, off with the inductors and the output capactiors:

Cleaning the leftover solder out of the holes took a seriously powerful soldering iron and a desoldering wick, and left some big splotches of burnt rosin on the underside of the PCB:

I'm not killing this board, I swear! It looks ugly but it's actually just a brown residue that wipes away with some rubbing alcohol. The new caps and inductors went on without a fuss:

Note the one output cap upside down just to drive those of us with OCD berserk. I didn't even notice at the time, but film capacitors are nonpolar so it doesn't really matter.
Another cap that came out turned out to have different sized lead spacing than the replacement I bought. On the left is the original, right is the replacement:

Not to worry though, because some simple work with a pair of needle nose pliers evens out the lead spacing:

And in it goes without a fuss:
Next up was the main power capacitor. The original one was rated at 2200μF and 16V, but this was grievously under spec. Most people went to 4700μF or higher, I chose a 5600μF unit rated at 25V. The voltage rating was much higher as an added safety margin. The problem this posed was that the new capacitor was much larger:

In fact, if it was mounted flush against the PCB the unit would not fit back into its housing. The fix was simple enough since the clearance was off by only a few millimeters at most. Affixing the capacitor slightly tilted in relation to the PCB let it go in without an issue:

The last part of note was the nonpolar caps in C20 and C21. The spots on the board for them were actually marked as polar:

Not a big deal, though I still ended up putting the shorter lead through the negative marked hole as a force of habit. In went the rest of the caps and a set of replacement white LEDs that will light up at a lower intensity:

The finished, modded PCB:

A pile of the old parts I stripped off:

And the bottom of the PCB, after cleaning most of the burnt rosin residue off:

Finally, plugging it in and flipping the power switch!

The modded unit passed what I coined "the other POST"- the "Power On Smoke Test" with flying colors. No buzzing, no smoking, no fuss.
The moment of truth was upon me, then: did all this work actually make a difference?
Yes, yes it did. It made a positively amazing difference. Everything sounded much fuller- the bass response was better, the mid range sounded nicer, and the overall range was much more clear. There was a massive difference with the tone circuit bypass, which now sounds almost as good as with the tone circuit engaged. There is a slight difference in the gain between the two settings, but I still prefer to have the tone circuit engaged. This improvement was not just placebo effect either, I had a number of impartial listeners remark about how good it sounds now. All told, the parts cost me about $15, so it was a significant investment in terms of the original cost of the unit. That said, for $35 this thing kicks ass. I'm very impressed with it at the price point. Of course it's not going to stand up to top end stuff and it doesn't have gobs of power to drive bigger or more inefficient speakers, but all told I'm positively thrilled with how it came out.
The only caveat I would give is that this unit really shines after all the mods but is just average before them. If you don't know how to solder or don't want to take this unit apart to mod it, you might not like it as much as I did.
EDIT: I've gotten requests to post up the parts list for what I replaced.
IMPORTANT! Be aware that this is for the PCB that is marked "LEPY LP2020A+ 130416PCB" and if your unit is a different revision, the location of components may have changed. If you find a discrepancy, just replace the cap with a higher quality one of the same specifications. The only caps I altered the spec on were the main power cap (C1 got a higher capacitance and voltage rating) and the coupling caps (C30 and C31 got film caps of the same spec)- in both cases they should be relatively easy to find even if their number has changed.
U1 and U2 replaced with Linear Technology LT1364 (or your favorite equivalent op amp)
C1 replaced with Panasonic EEU-HD1E562B (or equivalent 5600µF 25V cap)
C3 replaced with Nichicon UKW1C471MPD (or equivalent 470µF 16V cap)
C4 and C10 replaced with Nichicon UKW1H010MDD (or equivalent 1µF 50V caps)
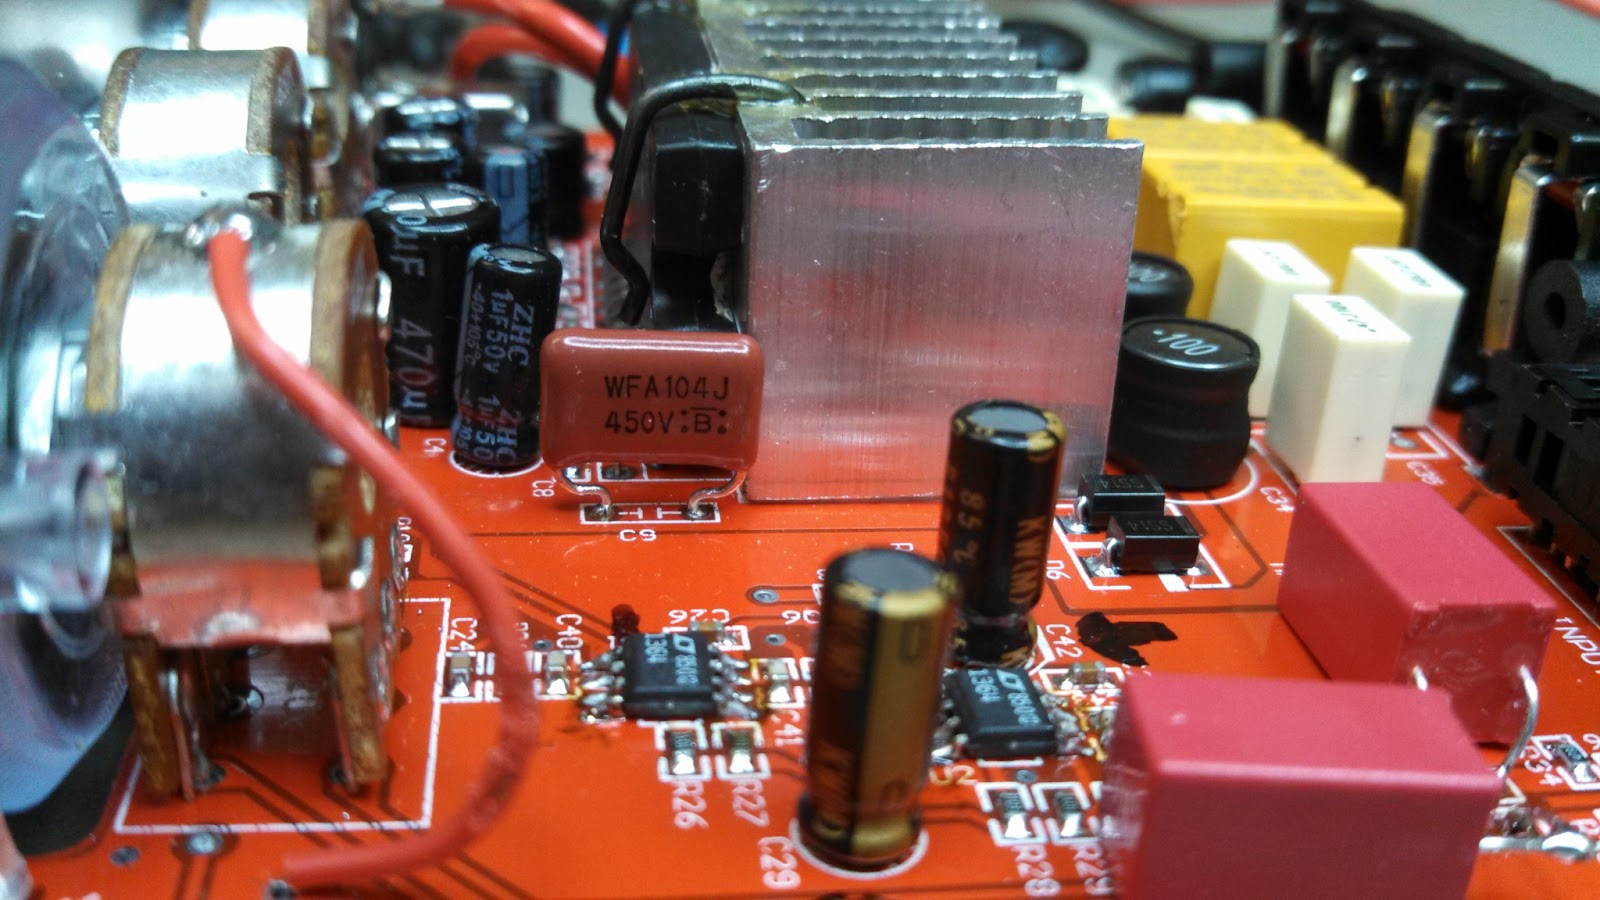
C9 replaced with Panasonic ECW-F2W104JAQ (or equivalent .1µF 450V cap)
C14 and C15 replaced with Nichicon UFW1A221MED (or equivalent 220µF 10V caps)
C20 and C21 replaced with Panasonic ECE-A1HN2R2U (or equivalent 2.2µF 50V bipolar caps)
C28 and C29 replaced with Nichicon UKW1C101MDD (or equivalent 100µF 16V caps)
C30 and C31 replaced with WIMA MKS2C043301K00JSSD (or equivalent 3.3µF 63V film caps- whatever you can manage to fit)
C32, C33, C35, C36, C38, and C39 replaced with Kemet R82EC3470DQ70J (or equivalent .47µF 100V caps)
L1 replaced with Bourns 6100-100K-RC
L2, L3, L4, L5 replaced with Wurth 744732100
would you have a list of parts to replace and the part numbers for each item needs replacement.
ReplyDeleteThank man
ReplyDeleteI have replaced all the caps but not the ones behind the treble knob, not sure what to use to replace them maybe original type. Also would love to get the part number for L1, L2, L3, L4 and L5.
ReplyDeleteSorry about the delayed response, apparently I had no comment notifications set up!
ReplyDeleteAnyways, L1 was a Bourns 6100-100K-RC
L2 through L5 were Wurth 744732100
The caps behind the treble knob are Panasonic ECE-A1HN2R2U Bi-polar caps.
I'll edit the article when I get the chance and add a full parts list, I have to actually take the unit apart to look at the PCB markings so I don't lead anyone astray.
I'm wondering how difficult it would be to rebox this amp into another encloser? Could the mounted controls and connections be desoldered and wired to the board instead?
ReplyDeleteYou could take the controls off no sweat. The power switch and volume potentiometer are the only parts that have existing wires- everything else is through hole mounted so it's just a matter of wicking out the solder and it'll fall right off the board. Reboxing would be pretty easy if you have a compatible enclosure.
DeleteWhere can you get all of those parts for $15? Everywhere I've looked the total comes to around $30.
ReplyDeleteI got my components from Mouser Electronics, but I probably should have mentioned that the LT1364 op amps were extras I had laying around. Depending on where you get them, that's probably most of the price difference right there. Sorry about that!
Deletefucking awesome dude just need the t9 screwdriver i will give it a go thanks for great explanation
ReplyDeleteNice mod u have here. May I know is it possible to use full Worth or Bourne inductors for the mod? Thanks
ReplyDeleteThe brand of inductor shouldn't make a difference, but be sure L2, L3, L4, and L5 are shielded!
DeleteThanks Kyle for the reply. Seems like Bourne version is higher amp and cheaper than Wurth. Probably I will use Bourne version for all. ��
DeleteDid you also have problem, prior to your mod, that the amplifier couldn't be driven beyound ~1/4 volume, before cutting the sound? (Generating a Error) And did your mod fix this?
ReplyDeleteSounds like you got a defective unit. Check your connections and try the speakers with a different amp just to rule out the simple stuff, but my guess is you got a dud.
DeleteThe mod might (MIGHT) fix it if it's something simple like a cap being blown out, but then you also run the risk of something else being broken and now you've spent $30 in parts and a few hours (depending on how fast you solder) on something that's still busted.
I would try to exchange it.
Thanks for your post. I'm not too keen on the blue light either. I was just thinking of cutting the LEDs out. Do you think that will completely break the circuit or affect the output? I am not bothered about lighting and don't really want to buy a soldering iron - don't do much modding! Thanks!
ReplyDeleteLinrose makes different color LED some that aren't really bright.
Delete@James: That wasn't the question. He hasn't got a soldering iron - so replacing the LEDs isn't an option. I'm also curious if one can just cut them loose?
DeleteHello @housecast and @Willian Brisbane, if you cut the LEDs you won't be affecting the output; no circuit will be broken. From what I remember from my PCB, they stood apart from the main circuit. Plus, I would think it'd be very bad circuit design to place the LEDs in the middle of a circuit, affecting the output. Plus, I've read of at least to people who didn't like the light and just cut them out with no output issues at all. I might recommend, however, to give it some time to grow on you: I was decided from the start to pop those horrible blue LEDs and pop in some different ones, and after a lot of work on the unit, and making a nice, elegant wooden casing, in the end I made my peace with the horrible blue lights and now they're not as horrible! If you still want some light, just not blue, and you can't desolder them and substitute them, I would recommend trying with some coloured gels or plastics over the LEDs. They won't change the color completely; that is, you can't get white or red or green, etc... this is only blue light; but you'll decrease their perceptual output and you might get violet or fucsia, etc. Good luck!
DeleteBeginner question...do you have to solder both sides of the pcb for the through-hole components? I replaced all the parts (yes, at once, yeah I know better now), and the unit wont turn on.
ReplyDeleteThank in advance.
Dave
Just put solder on the bottom of the PCB with the component's leads stuck through the holes. Trying to do it on top too is going to be a huge pain in the butt and it won't do anything better anyways!
DeleteRegarding the not powering on part- be patient, double check that all your components are in the right places and soldered, and try it again. If that doesn't help, you can start troubleshooting specific areas with a multimeter to identify a broken component, but remember to be safe and don't do that while it's plugged in! (A google search or two about troubleshooting circuits would also help here!)
Hello, Kyle, this is an excellent guide to modding one’s Lepai. Thank you very much for the effort! I recently bought a Lepai 2020A+ (received it less than a month ago), and when I stumbled upon this “modding manual,” I decided to try it out. My Lepai came with a faulty pot anyway, so if I have to tweak that, why not tweak everything worth tweaking? Anyway, first thing I’ve done before going and ordering all the parts you mention is open up the Lepai to see what’s going on inside. Right off the bat, I noticed my Lepai’s untouched guts don’t look exactly like the untouched guts on your Lepai, even though the color of the board seems to indicate they are the same overall version. Well, it seems that the makers of this little amp have been tweaking with the design even after the latest important board update. Maybe they’ve changed some of the subpar components for some that are a little better? I don’t know. Seeing as you are so kind as to answer the questions your readers leave you in the comments section, even after a couple of years of having posted this project, I’m leaving you a link to a high-res photo of my untouched board in my Dropbox with the hopes that you might advise me as to what component changes you mentioned are still necessary.
ReplyDeleteYou’ll be able to see everything in detail in the photo; as for the info you might not be able to deduce from it:
The main power capacitor is still 2200μF 16V. The rest of the capacitors on the lower half of the board are, from left to right: 470μF 10V; 220μF 16V; 2.2μF 50V; 2.2μF 50V; 1μF 50V; 470μF 16V; 1μF 50V; 470μF 16V; 100μF 16V; 100μF 16V.
Also, I was thinking of incorporating a Bluetooth receiver into my Lepai. I don’t know if you’ve come across this mod.
Anyway, thanks a million for this incredible “modding manual,” and if you have the time to take a look at the photo of my board and give me some advice on my personal modding project, thanks another million!
Cheers!
I'm thinking that the internal components are supplied by whoever has the best bulk pricing on the market at any given time. Though that input inductor (L1) certainly looks a lot better than what came with mine, I would guess it's just the way they maintain their price point, and not any indication of a move to better internals.
DeleteAs long as you have the Lepai open and are soldering, I feel it probably makes the most sense to just do the full mod. However, the "lite" version that apparently makes the most difference with the least number of parts replaced would be uprating the main power cap (C1) and converting the audio coupling caps to film (C30 and C31).
I can't say I've seen the Bluetooth mod, so I don't really have much input there. I use my Lepai to drive the speakers on my gaming PC, so I have no need for it.
Excellent! I think I'm going to go for the full makeover and see how good a quality I get at the end of it.
DeleteI can tell you though, I'm not looking forward to changing those op-amps... I think that's where the entire project could turn into a nightmare. Any soldering advice on this?
Again, thanks a lot, Kyle!
It's definitely a challenge, but just remember it's not a beauty contest, and it doesn't cost you much to try, try again. Tweezers and a magnifying glass are pretty much required.
DeleteRemoval of the old units can be annoying- solder wick is your friend! For what it's worth, I would do this with C42 and C29 out of the way, too!
First off, make sure everything is nice and clean. Then, dab a tiny bit of solder on one of the surface mount pads- use a corner to make things easy. After that, put your op-amp down on the board making absolutely sure it's oriented properly. Re-flow that solder you put down earlier while nudging the op amp down onto the board with tweezers. If it ends up crooked, re flow and tweak with the tweezers until you have it lined up. Now you've got it anchored to the board and it shouldn't slip and slide around.
Then it's just a matter of carefully getting a little bit of solder onto each lead. A super narrow tip for your iron is also really nice here!
If it gets all buggered up on the first try, don't take it too badly- I had to wick away and reflow my first attempt on one of them.
Good luck!
Hi again, Kyle!
ReplyDeleteJust waiting for all the parts to arrive so I can continue with my Lepai project. But while I'm waiting, I took another look at my PCB and noticed that C14 and C15 are not both 220µF 10V caps like you've on your board, but rather C14 is 220µF *16*V and C15 is *470*µF 10V. I was wondering if you think I should go ahead and get better quality caps with these individual values I have on my board or just stick with two 220µF 10V caps?
As always, thanks a bunch!
Hoping to finish this project soon!
X.
P.S. Also, went over to Mouser Electronics to get my parts and it turns out the Panasonic .1µF 450V cap is out of stock and I would have to wait until October to get it! I'm looking everywhere and I can't find a suitable match. Do you have any recommendations as to where I can buy online? Preferably of the delivery doesn't cost an arm and a leg--I live in France, and the Mouser delivery is about as much as the cost of all the parts!
I think the best idea would be to replace C14 and C15 with the values your board came with, rather than changing them over to my specs.
ReplyDeleteAlso, I honestly have no idea where to shop that has reasonable international rates- it's never something I had to worry about! So I'm afraid I can't be much help there.
I am now modding my own Lepai - LP-2020A+ T-Amp & had a question I hope you could please answer for me if you can. On numbers C30 & C31 you used 3.3uf 63volts Film Capacitors to replace the awful ones used in the signal path circuit. Can I use 3.3uf Film Capacitors that have a DC voltage up to 250 volts instead? Or do I have to stay with 63volts to keep from burning anything out on this circuit pathway? Your help will be greatly appreciated, thank you.
ReplyDeleteThe voltage rating of a capacitor is for the voltage it can withstand safely, and has nothing to do with what it puts out. So yeah, a 250V cap would be no problem whatsoever.
DeleteI have the newest version Lepai - LP-2020A+ T-Amp & I have a question I need help with. Numbers C20 & C21 on my PCB don't have bipolar capacitors, but has ceramic capacitors instead. They are similar to C30 & C31 but a little smaller. How can I find out there values to replace them with the correct spec replacement? Because they don't have anything printed on them to go by. I don't know the values of C20 & C21 or C30 & C31 on my version PCB and need your help to figure out what they are, if you know how to test them to find out there correct uF & voltage specs. Please help me out Kyle.
ReplyDeleteThat one I can't answer very well because I don't know what kind of equipment you have to test with. If you have a good digital multimeter there should be a mode to test capacitance.
DeleteCheck out http://en-us.fluke.com/training/training-library/test-tools/digital-multimeters/how-to-measure-capacitance-with-a-digital-multimeter.html for a better idea of what you're looking for.
Thanks for the help Kyle. I have a multimeter but I can't test it on the capacitors with it still on the PCB, do to risk of damaging the capacitors or other components in line with the circuit path way. I guess I will have to take a chance of ruining the amp & replace the capacitors with the same spec's as yours for C20 & C21 and also C30 & C31. I just hope it works or I will have wasted my money for nothing. I have my fingers crossed. Thanks again for your time & expertise, Kyle.
DeleteI have one last question left for you Kyle, & by the way thank you once again for all your help so far. I have done a lot of home work checking all the board versions I could find on the internet & found out that most early versions use 3.3uf 63v SMD Chip Capacitors on C30 & C31 and then newer ones use 2uf 63v SMD Chip Capacitors and the resistors in the input signal circuit are the same specs for all versions. My question is what would happen to the input signal circuit if I raised or lowered the capacitance of C30 & C31? The reason I ask is I can't find my version board schematic on the internet and don't know the values of C30 & C31 on the board I have, to know what to correctly replace them with. I hope you can help me out one last time.
ReplyDeleteAh jeez, I think you've reached the limits of my electronics expertise here. My (admittedly quite limited) understanding is that those caps are coupling capacitors, and that higher impedance (the 3.3uf) gets you less filtering of your low frequencies, and the lower impedance (the 2uf) gets you more filtering. What that means is that the 3.3uf will sound louder at any given volume knob position but might have "muddy" bass, and the 2uf will sound quieter at that same volume knob position but have cleaner bass.
DeleteTake that all with a grain of salt, as it's very possible I'm just totally wrong or misunderstanding some key aspect of it.
thanks for the cool review/guide! going to order one right now!
ReplyDeletethanks for the cool review/guide! going to order one right now!
ReplyDeletethanks for the cool review/guide! going to order one right now!
ReplyDeleteVery awesome modding here! I'm looking to pick up a newer version with a usb port/input to power a chromecast audio (kind of an all-in-one sonos killer). Do you have any idea if the newer LP-V9S is at all similar?
ReplyDeleteHello, @Unknown, in my research I have found that the 2020A+ is the best Lepai has done. No older or newer version of the 2020's series nor any other Lepai model (i.e. the V9S or otherwise) is anywhere as "good" as the 2020A+. Again, make sure it's the PLUS, which is the model this mod is about. Now, even the PLUS has upgrades. Sadly, you usually won't know what iteration of the 2020A+ you're going to get (that is, until you open up the body and look at the board). For instance, my version is somewhat newer than Telfpreen's (see my comment above, where I include a photo of the board) and the components are therefore not the same.
DeleteI have one of these amps that has R44 (which is just in front of the tone switch) smashed. Does anybody know what to replace it with? It's very tiny!
ReplyDeleteI have one of these amps that has R44 (which is just in front of the tone switch) smashed. Does anybody know what to replace it with? It's very tiny!
ReplyDeleteHello, again! Just wanted to come back and pitch in with the mods I've been doing based on this very cool review/modding recipe. As I said in previous comments, my board is a little different than the one shown here, but most of the mods recommended are still suitable.
ReplyDeleteI live in France and many of the components listed are, incredibly, unavailable here! Ordering them from the US would cost more for S&H than the components themselves. Anyway, besides, the fact that this model (the 2020A+) is no longer being produced, and that the new ones are, sadly, less impressive than this one, I'm taking it rather slow and easy with my modding: I don't want to ruin the amp I have.
I'll be adding here (if Kyle doesn't mind) the variations I'm forced to make because I'm not able to get all the comps or equivalents recommended.
Here you can see the changes made so far: http://bit.ly/1SwKWYA
I finally got the first batch of comps and I’ve soldered them and... the amplifier is not dead! In fact, I believe the sound quality has already increased perceptibly.
1) I changed the vol pot to prevent a horrible crackling and excess voltage coming out of the left channel. This solved the issue. I also decided to make it a logarithmic pot, as the original one is linear. I'm not 100% convinced this was a good decision; now all the higher vols are bunched up at the end of the dial, so about 50% of the dial will be useless… Anyway…
2) I changed C1 to a Nichicon 4700μF 25V. I wanted to get the 5600μF 25V recommended by Kyle, but could only find the 4700μF, which I found in Spain and had it sent. It’s good for now, but I think Kyle’s version should be much better. In the same Dropbox folder there’s a video showing the original sound and the sound after the new cap. Is it me or do you already hear a rather audible difference? A certain clarity, perhaps?
3) Couldn’t find a 0.1μF 450V cap for C9, so I changed it to a 630V cap... MUCH bigger, as you can clearly see! But I managed to make it fit.
4) C8 and C9 were changed to Nichicon 100μF 25V caps, again because I couldn’t find 16V ones.
5) C4 and C10 I changed to Nichicon 1μF 50V caps. After these 3 mods maybe the sound is crisper than after the 4700μF cap came in, the details are more noticeable, but it’s not really very noticeable.
6) Finally, I repasted the chip to the heat sink because it had NO thermal paste whatsoever! They almost completely skipped it! I believe I’ve gone a little/lot overboard with the thermal paste, as you can see in the photos... It was very late at night and I was tired!
Well, I had also found film caps to change the ceramic ones on C30 and C31 on the signal input but I stupidly clicked on the wrong ones when I ordered, so instead of ordering WIMA 3.3μF 63V caps, I actually ordered 0.33μF ones.... :[ So I now have to wait for the guys in Spain to let me know if they got any of the other comps I need in order to get the right caps, otherwise I’ll just be spending too much on S&H here as well!
So sad one can’t get these things closer to home! If anyone out there lives around Paris and knows of a good place where one can really get the comps on needs four audio electronics, please let me know. I’ll be eternally grateful!
Anyway, that’s that for now. Will be back with more updates when they happen.
Until then: good Lepaiing, guys!
I found this guide while waiting for amp, almost certain I was gonna give it ago. Sadly what I received was an LP-2020A. And indeed, after looking at my confirmation e-mail, that was what I had ordered (turns out the seller had used a picture of the LP-2020A+ version). Anyway, my question is, can I use this guide to improve the amp I got or does it have to be the LP-2020A+?
ReplyDeleteHello,
ReplyDelete2 questions regarding modifying this amp:
1. Are the inductors indicated your parts list indicated with the letter L?
2. Will replacing the inductors help with FM radio interference? When I hook up a FM radio to my amp, the signal is significantly reduced.
Hello,
ReplyDelete2 questions regarding modifying this amp:
1. Are the inductors indicated your parts list indicated with the letter L?
2. Will replacing the inductors help with FM radio interference? When I hook up a FM radio to my amp, the signal is significantly reduced.
Don't have this unit yet; but am certainly going to get one and mod it as to your specs. Can't wait to heat up the iron! Thanks for posting.
ReplyDeleteGundy, VE7TNN
Many thanks for this guide, it pointed me in the right direction.
ReplyDeleteQuick question, did you have any/many issues desolering components? It would seem like the later models are using lead-free solder and the thrice damned thing has been borderline impossible to desolder properly.
Altough considering the abuse i've given it, and the sound now, this is one sturdy little amp. The pots are crap, the tone switch is crap, but the sound now is miles above what it was.